Give Program (P) a Try!

Give Program (P) a try!  

John Hadfield, Waverley Camera Club Member, talks to Anne Ramus

It’s common for some photographers, particularly beginners, to ask what mode they “should” be shooting in.  Perhaps there’s some mystique about using Manual in that pros allegedly use it?

Many pros use Manual because it suits the consistency of a fixed lighting environment – the set-up time is not an issue. But in a shooting situation where lighting or focus points may be constantly changing, being in Manual mode means too much time is taken setting up the shot – and a fleeting photo opportunity may simply whizz past while you’re busy wrangling settings!

Look at it this way: Manual requires you to set both Aperture and Shutter Speed, but you’re using the camera’s light meter to guide you.  So if you use Aperture Priority, you’re making a selection essentially around Depth of Field – it’s easy if the whole shoot session involves this element.

If you select Shutter Priority you’re making a selection based on freezing the action or recording a blurred (intentional) image, such as with active children or pets, or sports action.  With either Aperture or Shutter Priority modes, the camera sets the correct exposure control to balance your particular selection using its light meter.  Otherwise, you could lose a lot of shots simply because by the time you’ve set up your camera, the moment has passed.

Now let’s look at one pro who presented at a couple of our WCC workshops on photo journalism – and he shoots for Getty Images.  He uses Program (P).  Program is a good balance if you don’t have a need to bias aperture or shutter speed to capture a certain image.

I use P all the time for general shots.  P is like Auto but it doesn’t fire the flash for almost every shot.  P doesn’t change the ISO.  P is good because it has a progression of aperture and shutter speeds depending on the amount of light and the focal length of the lens.  As you use a longer focal length, it quickens the shutter speed to minimise blur from camera shake.

Give Program (P) a try.  Only go to a priority (A or S) for a particular type of image control, i.e. depth of field or shutter speed for stopping action or causing blur.  Unless you have a particular image style in mind, I would set your camera up for a day’s general shooting  (and the level of light) to give you a reading of about F/5.6 – F/8, a Shutter Speed of not less than 1/125 and an ISO to give you those readings (probably about ISO 200-400).

Set the Mode to Program (P), only changing to Aperture or Shutter to suit a particular type of shot.  I would guess that 80% of your shots will fall within that range I mentioned above.  I would increase the ISO as necessary to keep within my suggested aperture/shutter speed range for general daytime photography.  Be aware that the lower the ISO, the less image ‘noise’.  Further, cameras vary in their ability to handle noise – another factor which will influence your choice of ISO setting.

Overall, it’s important to realise that the “Exposure Triangle” of Aperture, Shutter Speed and ISO always involves compromises; it’s a juggling act of your own creative decisions plus the technical path you choose to achieve the image you want.


Anne Ramus

Out of the dark and into LightRoom

From club member Anne Ramus:

I was a person unfamiliar with the digital world when I took up “art photography” upon retirement about two years ago. A huge part of that journey has been coming to grips with post-processing using LightRoom software.

And what a buzz it is! I’m hoping my experience inspires others to plunge into this editing software and to keep swimming – even though at times, like me, you might feel you’re drowning and are tempted to give it all away. Persist – be stubborn about it. It hasn’t been quick or easy for me, but the benefits of finally nailing a reasonable level of digital photography and post-processing have been huge.

Accustomed to making things up as I go along, including leaving the reading of instruction manuals till last, I found LightRoom a challenge. I was impatient, with a bull-at-a-gate style. I’ve learnt that staying cool and methodical and being organised are much better options.

Firstly, you have to get your head around the way LightRoom stores your images: it catalogs the changes you make, not the whole image. In that way, it takes up much less precious space on your hard drive. Every time you bring up your amended photo on the monitor, LightRoom takes the original photo stored on your computer, adds the changes you’ve made, and shows your latest version of it whenever you access it.

It’s therefore critical where and how you file your original photos. And don’t meddle with them after importing them into LightRoom, creating chaos like I did initially. Once you’ve imported them, moving photos on your HD breaks the link that LightRoom originally established and needs to operate. It won’t find your photos, and you’ll be tearing your hair out trying to locate them and re-establish connections. Establishing an organised filing system to work out of, then getting into the rhythm of a methodical LightRoom workflow, are first critical steps. And tag your photos with keywords. I didn’t for a while: I thought it was a waste of time. Instead, I wasted countless hours wading through mountains of images looking for photos …

Secondly, with your filing system nicely established and operating well, you’re free to explore LightRoom’s exquisite capabilities for making your shots look even better and more competition-worthy. It’s a creative process, but it’s also very technical. As a (right-brain dominant) oil painter accustomed to free-wheeling with paint on a blank canvas, I found it a challenge to have to “stop, think, read, follow, do” according to a manual and a merciless left-brain computer.

A side-benefit to me of this learning was an understanding of how computers behave, their language and their protocols. LightRoom learnings translated across the board into other digital areas, like my iPhone and iPad. I’m learning faster and better by being much more confident and effective in searching out all sorts of information on the internet. I am now clearly more knowledgeable than my 4-year-old grandson!

There’s a goldmine of photo gurus and teachers out there that you can tap into – for free. Explore to find the ones that suit you best. You’ll refine your list down to the ones that align with your learning style and level of expertise. I have 5-6 favourites and by subscribing to their websites, I receive alerts of tutorial topics available.

Talking of experts, if you still (like me) feel comfortable seeing words, diagrams and pictures on paper, Scott Kelby’s LightRoom Manual is a “must have”. He is the very consumer-friendly god of LightRoom and also offers excellent free internet tutorials on an endless array of photography topics and techniques.

Whether you have a point-and-shoot camera or a big black DSLR, if you’re struggling to get your photos to look like you want them to, consider LightRoom. I’ve been told it’s more user-friendly than Photoshop, yet if you want to progress to Photoshop, it’s an easy bridge to cross. Along with a range of other photography software, there are also elements of Photoshop that you can use via LightRoom.

At this point in my photography career, I’m content with LightRoom, aware that I still have lots to learn about this software as well as my camera and lenses. When (or if) I’m ever feeling creatively or technically constrained by either LightRoom or my equipment, I’ll move onwards and upwards. But at the moment, the joy of continually discovering more of what LightRoom can do for me seems boundless!

Anne Ramus
February 2014

Sutherland Shire National Exhibition of Photography – Results 2013

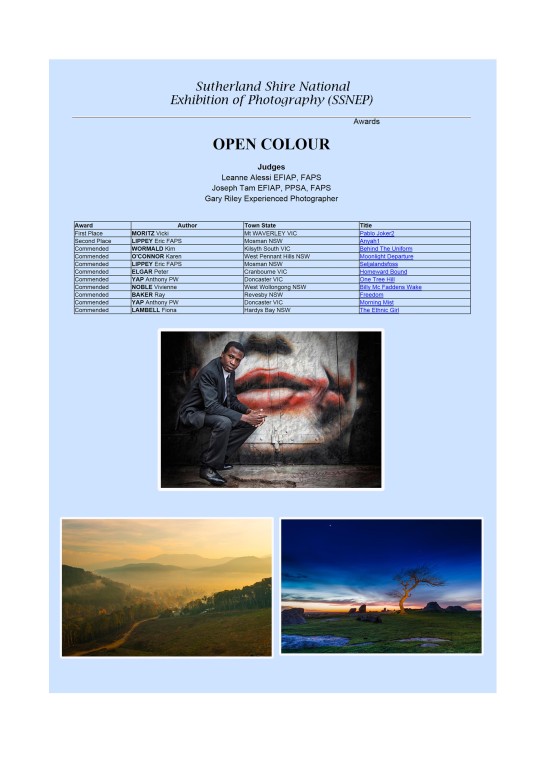
I’m pleased to announce that two members of WCC have achieved excellent results in the Sutherland Shire National Exhibition of Photography competition for 2013. As you may well guess, one of them is Vicki Moritz who always does well in anything she enters and in this case she has achieved FIRST PLACE, the mark of an excellent photographer. The other is Anthony Yap who is just up and coming in the club and there is just no holding Anthony Back. He has huge enthusiasm for all things photography and we all should look to him for inspiration in the coming years, another excellent photographer in the making. Anthony has achieved two Commended awards in this competition.

Please see the details below:

nationals

The Story Behind the Photo

“Don’t put up with rubbish” and “Don’t put rubbish up” are the two lessons Cuc Chong learnt from this Lakes Entrance image.

In preparation for the landscape competition in May this year, I set out to take some landscape images. We arrived in Bairnsdale in the late afternoon and a local told us that Ninety Mile Beach is great for sunrise and sunset, so we decided that we would head there early the next morning.

When we arrived at the Ninety Mile Beach, I was disappointed as the scene was filled with endless sand and water, there wasn’t anything interesting. I decided to climb up the sand dune and the scenery wasn’t much better. I remembered Pete Davies said “make the extraordinary out of the ordinary” at the end of the beginners course, so I decided to apply that insight.

I set my camera on the tripod as low as possible, using gradual neutral density 0.6 to balance the light between the sky and the foreground. I was too excited about capturing the emerging light and that I didn’t see the rubbish that lay within the shot.

During the competition judging night, I was hammered left, right and centre about how a good image was ruined by the rubbish within. Hence lesson 101 ‘Don’t put up with rubbish’.

Lake

I could have removed the rubbish during post production, but at that stage my editing skill in Photoshop or Lightroom was limited and I couldn’t rescue the image from its fallen grace. I should have been more patient and waited until my editing skills were good enough to remove the rubbish. The image has been published without correction and it’s irreversible, hence lesson 102 ‘Don’t put rubbish up’.

Editor’s Note: Irrespective of the “rubbish” in the foreground, the WCC selection panel for the Eastern Interclub 2013 competition entered Cuc’s photo in the EDI section where it was awarded a merit. Well done Cuc, not only did you learn two valuable lessons but also a merit in an inter club competition against very good competition. Thanks for sharing your experience.

The Story Behind the Photo

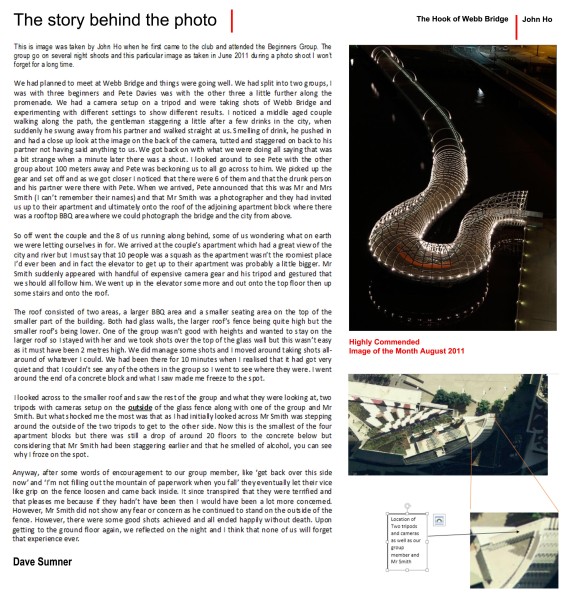
Here’s another of my long winded stories about a photo, if anyone else has anything that they would like to tell us about then please email it to me with a jpeg image of the ‘Photo’ in question and I’ll ensure it gets place on the website and the Facebook page.

Dave Sumner What a poser

Thanks

Dave Sumner
WCC Secretary